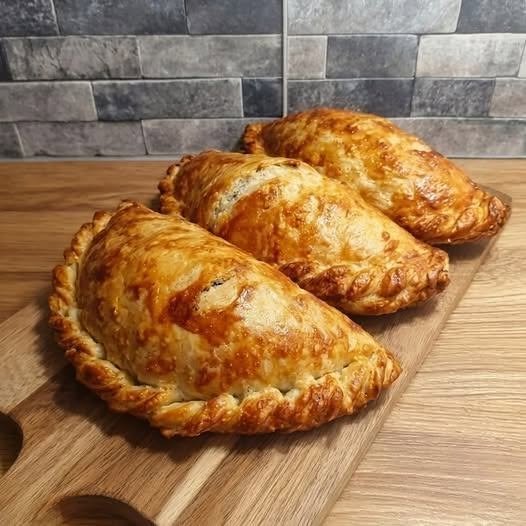
A traditional Yorkshire pasty is a hearty, rustic pastry filled with simple ingredients such as beef, potato, onion, and swede (rutabaga). Unlike the better-known Cornish pasty, Yorkshire versions have historically varied considerably from household to household. The defining character is generous, comforting filling enclosed in crisp, golden pastry. This recipe aims for a traditional farmhouse style: substantial enough for a packed lunch, but delicious served warm from the oven.
Ingredients
For the pastry
- 500 g (4 cups) plain/all-purpose flour
- 1 teaspoon salt
- 125 g (½ cup + 1 tablespoon) cold unsalted butter, cubed
- 125 g (½ cup + 1 tablespoon) lard or vegetable shortening
- 150–175 ml (⅔–¾ cup) cold water
- 1 egg, beaten, for glazing
Using a mixture of butter and lard gives the pastry both flavour and a particularly crisp, sturdy texture. If you prefer, you can use all butter, although the finished pastry will have a slightly different character.
For the filling
- 400 g (14 oz) beef skirt, chuck, or another well-flavoured stewing cut
- 300 g (10½ oz) potatoes
- 200 g (7 oz) swede/rutabaga
- 1 medium onion
- 1 teaspoon salt, or to taste
- ½ teaspoon freshly ground black pepper
- 1 tablespoon plain flour
- 25 g (2 tablespoons) butter
- 2–3 tablespoons beef stock or water
The vegetables should be cut relatively small so that they cook completely inside the pastry. Beef skirt is especially good because it has a rich flavour and remains tender when baked slowly.
Step 1: Prepare the Pastry
Begin by making the pastry because it needs time to rest.
Put the flour and salt into a large mixing bowl. Add the cold butter and lard. Rub the fats into the flour with your fingertips until the mixture resembles coarse breadcrumbs. Work quickly and avoid warming the fat with your hands.
Make a well in the centre and gradually add the cold water. Mix with a knife or wooden spoon until the dough begins to come together. You may not need every drop of water, so add it gradually.
Turn the dough onto a lightly floured surface and gently bring it together. Do not knead it heavily. Overworking pastry develops gluten, which can make it tough rather than tender.
Shape the dough into a ball, flatten it slightly, wrap it, and refrigerate for at least 30 minutes. If you have time, an hour of chilling is even better.
Resting is important because it allows the flour to fully absorb the water and gives the gluten time to relax. This makes the pastry easier to roll and reduces the likelihood that it will shrink dramatically during baking.
Step 2: Prepare the Filling
While the pastry rests, prepare the filling.
Trim any particularly tough pieces of fat or gristle from the beef. Cut the meat into small cubes, roughly 1–1½ cm (½ inch) across. Traditional pasties generally use raw meat rather than cooked beef because the meat cooks inside the pastry and contributes flavour and moisture to the filling.
Peel the potatoes and cut them into small cubes. Peel the swede and cut it into similarly sized pieces. Finely chop the onion.
Place the beef, potato, swede, and onion in a large bowl. Sprinkle over the salt, black pepper, and flour, then toss everything together thoroughly.
The small amount of flour helps absorb some of the juices released during cooking. It also contributes to the rich gravy that develops inside the pasty.
For an especially traditional flavour, avoid adding large quantities of herbs, garlic, or strong spices. The beauty of this style of pasty lies in the combination of beef, root vegetables, onion, seasoning, and pastry.
Step 3: Divide and Roll the Pastry
Preheat your oven to 200°C (400°F), or 180°C (350°F) fan-assisted.
Divide the chilled pastry into four equal portions. If you want smaller pasties, you can divide it into six portions instead.
Roll one portion at a time on a lightly floured surface. Aim for a roughly circular piece about 20–23 cm (8–9 inches) in diameter and approximately 3 mm thick.
It does not need to be perfectly round. Traditional homemade pasties are rustic food, and slightly irregular pastry is part of their charm.
If the dough becomes difficult to roll or begins to soften excessively, return it to the refrigerator for several minutes.
Step 4: Fill the Pasty
Place one-quarter of the filling slightly to one side of the centre of the pastry circle.
Leave a border of approximately 2–3 cm (about 1 inch) around the edge. Do not pile the filling excessively high, because the pasty needs to close securely and the vegetables need enough room to cook.
Dot the filling with a small amount of butter. Add approximately 1 tablespoon of beef stock or water.
The liquid is important because it helps create a moist, savoury interior. However, don’t add too much. Excess liquid can leak from the pastry and make the bottom soggy.
Fold the pastry over the filling to create a semicircle. Press the edges together firmly.
Traditionally, the edges are crimped or folded to create a strong seal. You can make a simple decorative crimp with your fingers or press the edge with the tines of a fork.
Repeat with the remaining pastry and filling.
Step 5: Glaze the Pasties
Transfer the pasties to a baking tray lined with parchment paper.
Beat one egg and brush it generously over the pastry. The egg wash gives the finished pasties their attractive deep golden-brown colour.
For a rustic appearance, you can leave the surface relatively plain. Alternatively, make two or three tiny slits in the top of each pasty. These allow some steam to escape during baking.
Don’t make large holes, as you want to retain the juices produced by the beef and vegetables.
Step 6: Bake
Place the tray in the preheated oven and bake for approximately 45–55 minutes.
The exact time will depend on the size of your pasties and your oven. They should be beautifully golden brown and crisp on the outside.
Because the filling contains raw beef, make sure the meat is thoroughly cooked before serving. If you have a kitchen thermometer, the thickest portion should reach a safe internal temperature appropriate for the beef and local food-safety guidance.
If the pastry begins to brown too quickly while the filling still needs time, loosely cover the pasties with foil and continue baking.
Once cooked, remove them from the oven and allow them to rest for 10–15 minutes before serving.
This resting period is worthwhile. The filling will settle, the juices will thicken slightly, and the pastry will become easier to handle.
How to Serve Yorkshire Pasties
A Yorkshire pasty is substantial enough to be a complete meal. It can be eaten hot, warm, or cold.
For a traditional-style serving, try it with:
- Pickled onions
- Branston-style pickle
- Brown sauce
- English mustard
- Mature Cheddar cheese
- Peas
- Simple gravy
- A crisp green salad
For a particularly hearty Yorkshire-inspired meal, serve a warm pasty alongside peas and rich beef gravy.
Pasties also make excellent packed lunches. Allow them to cool completely, then refrigerate them in an airtight container. They can be eaten cold or gently reheated in the oven.
Tips for the Best Traditional Pasty
Keep the pastry cold. Cold fat produces a better texture and helps prevent the pastry from becoming greasy.
Don’t overfill. It can be tempting to add as much filling as possible, but an overloaded pasty is difficult to seal and more likely to split during baking.
Cut everything evenly. Potato, swede, and beef should be reasonably similar in size so that they cook at approximately the same rate.
Season confidently. Potatoes and pastry can make a filling seem under-seasoned, so don’t be afraid of using enough salt and black pepper.
Use a flavourful cut of beef. Lean steak will work, but skirt or chuck generally gives a more satisfying result because the fat and connective tissue contribute flavour as the pasty cooks.
Don’t skip the butter. A little butter placed inside the filling melts into the meat and vegetables, creating a rich, savoury filling.
Seal the pastry properly. A strong crimp prevents the juices from escaping and helps the pasty retain its characteristic shape.
Let the pasty rest. Cutting into it immediately after baking can release very hot juices and make the filling seem wetter than it actually is.
Making the Pastry by Hand
For the most traditional result, homemade pastry is strongly recommended. The pastry is not merely a container for the filling; it is an important part of the dish.
The combination of flour, fat, and water creates a pastry that must be strong enough to hold a substantial filling while remaining tender when eaten.
When rubbing in the butter and lard, stop once the mixture resembles breadcrumbs with a few pea-sized pieces of fat remaining. These small pieces can help create layers and flakiness.
When adding water, use as little as necessary. Too much water produces a wetter dough and can contribute to a tougher pastry.
Likewise, avoid kneading. Once the dough holds together, it is ready to chill.
A Note About Yorkshire Tradition
There isn’t one universally agreed recipe for a “traditional Yorkshire pasty.” Yorkshire has a long history of regional and household cooking, and pasties were made in different ways depending on what ingredients were available.
This recipe represents the classic idea of a hearty Yorkshire meat-and-vegetable pasty rather than claiming to be the only authentic version.
One of the attractions of pasties is precisely this flexibility. They were practical food: inexpensive ingredients could be enclosed in pastry, baked in one package, and carried easily to work or school.
The pastry provided both protection and sustenance, while the filling could be adapted to whatever meat and vegetables were available.
Vegetarian Yorkshire-Style Pasty
If you don’t eat meat, you can make an excellent vegetarian version by replacing the beef with additional root vegetables, mushrooms, or a combination of mushrooms and mature cheese.
A good filling might contain:
- Potato
- Swede
- Carrot
- Onion
- Leek
- Mushrooms
- Mature Cheddar
- Salt and black pepper
The vegetables should still be cut small, and you should avoid adding too much liquid. A little butter or cheese provides richness in place of the beef fat.
Storage and Reheating
Allow cooked pasties to cool before storing them.
Keep them refrigerated in an airtight container and use them within a few days, following your local food-safety guidance. For longer storage, past generous Yorkshireies can be frozen once completely cooled.
To reheat, place a chilled pasty in an oven at approximately 180°C (350°F) until piping hot throughout. Reheating in an oven rather than a microwave helps restore the crispness of the pastry.
If reheating from frozen, allow extra time and make sure the centre is thoroughly hot before serving.
Final Recipe Summary
For four generous Yorkshire pasties, make a rich short pastry from 500 g flour, 125 g butter, 125 g lard, salt, and cold water. Fill the pastry with approximately 400 g beef, 300 g potato, 200 g swede, and one onion, seasoned simply with salt and black pepper.
Roll the pastry into large circles, place the raw filling inside, add a little butter and stock, fold and crimp securely, then brush with beaten egg. Bake at 200°C (400°F), or 180°C (350°F) fan, for around 45–55 minutes, until the pastry is crisp and golden and the filling is fully cooked.
The result should be a sturdy, golden pasty with crisp pastry surrounding tender beef, soft potato and swede, sweet onion, and a rich savoury gravy. It is simple food, but that simplicity is exactly what makes a traditional Yorkshire pasty so satisfying.

