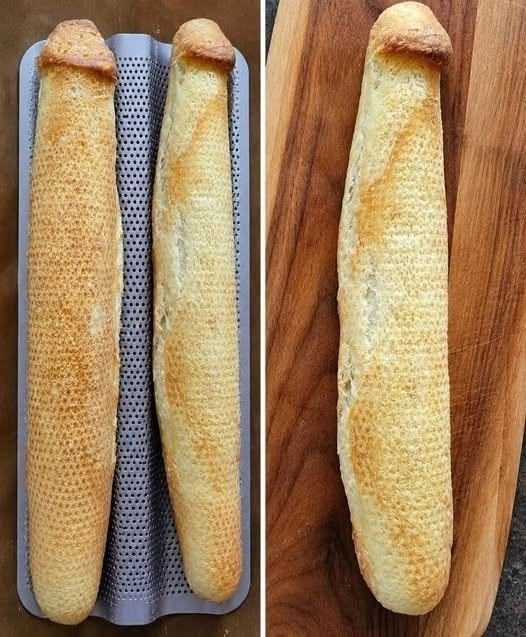
There is something wonderfully satisfying about making a traditional French baguette at home. A properly baked baguette has a deeply golden, crisp crust that crackles when you squeeze it, while the inside is soft, chewy, and filled with irregular air pockets. Although baguettes are made with only a few basic ingredients, the technique matters just as much as the recipe.
The good news is that you do not need expensive equipment or complicated ingredients to make delicious homemade baguettes. With flour, water, yeast, salt, patience, and the right baking method, you can create bakery-style bread in your own kitchen.
This recipe focuses on achieving the classic combination of a crispy exterior and soft, airy interior. The dough is kept relatively wet, gently handled during shaping, and baked with steam to encourage a thin, crunchy crust and good oven spring.
Why Make Baguettes at Home?
Fresh baguettes are best eaten soon after baking. The crust is at its crispiest, the interior is warm and fragrant, and the flavor is much better than bread that has been sitting on a shelf for hours.
Making baguettes at home also gives you control over the ingredients. You can choose good-quality flour, adjust the fermentation time, and avoid unnecessary additives. Most importantly, homemade bread gives you the opportunity to learn how fermentation, gluten development, shaping, and steam work together.
Do not worry if your first baguettes are not perfectly shaped. Even experienced bakers sometimes produce baguettes with uneven scores or unusual shapes. The goal is to develop a flavorful loaf with a crisp crust and light crumb.
Ingredients
For 3 medium baguettes, you will need:
- 500 grams bread flour or strong all-purpose flour
- 350 grams lukewarm water
- 10 grams salt
- 5 grams instant yeast
- A little extra flour for dusting
- Cornmeal, rice flour, or parchment paper for the baking surface, if desired
The 350 grams of water gives the dough approximately 70% hydration. This creates a fairly wet dough, which helps produce a lighter and airier crumb.
If your flour absorbs water differently, you may need to adjust the amount slightly. The finished dough should feel soft and somewhat sticky rather than stiff and dry.
Equipment
You do not need a professional bakery setup, but a few pieces of equipment make the process easier:
- Large mixing bowl
- Kitchen scale
- Dough scraper
- Clean kitchen towel
- Baking sheet or baguette pan
- Sharp bread lame or very sharp knife
- Wire cooling rack
- Small oven-safe pan for creating steam
A kitchen scale is particularly useful because measuring flour by weight gives much more consistent results than measuring it by cups.
Step 1: Mix the Dough
Add the flour and yeast to a large mixing bowl. Stir briefly to distribute the yeast.
Pour in most of the lukewarm water and mix with your hand, wooden spoon, or dough whisk until the flour is hydrated. Add the salt and the remaining water gradually while mixing.
The dough will look rough and sticky at this stage. That is completely normal.
Avoid adding large amounts of flour simply because the dough feels sticky. A wet dough is one of the secrets to achieving a soft, open crumb.
Cover the bowl with a clean kitchen towel or plastic wrap and let the dough rest for about 15 to 20 minutes.
This short rest allows the flour to absorb water and makes the dough easier to develop.
Step 2: Develop the Gluten
After the initial rest, you can develop the dough without aggressive kneading.
Wet your hand slightly, grab one side of the dough, stretch it upward, and fold it toward the center. Turn the bowl and repeat this process several times.
Perform about 4 to 6 folds.
Cover the dough and let it rest for another 20 to 30 minutes. Then repeat the folding process.
You can perform two or three rounds of folds during the first hour of fermentation.
This gentle technique helps strengthen the gluten while being less likely to knock all the air out of the developing dough.
By the end of the folding process, the dough should feel smoother, more elastic, and stronger than when you first mixed it.
Step 3: First Rise
Cover the dough and allow it to rise at room temperature.
Depending on the temperature of your kitchen, this can take approximately 1½ to 2½ hours.
You are not necessarily looking for the dough to double completely in size. Instead, look for visible fermentation: the dough should become noticeably puffier and may contain bubbles around the edges and underneath the surface.
For deeper flavor, you can use a slower fermentation. After the initial room-temperature fermentation, place the covered dough in the refrigerator for several hours or overnight.
Cold fermentation develops more complex flavor and can also make the dough easier to handle.
Step 4: Divide the Dough
When the dough has fermented, lightly flour your work surface.
Gently turn the dough out onto the surface. Try not to aggressively press or punch it down because you want to preserve some of the gas created during fermentation.
Divide the dough into three approximately equal pieces.
Use a dough scraper or sharp knife to make clean cuts.
Lightly shape each portion into a loose rectangle or short log. Cover the pieces with a towel and let them rest for about 15 to 20 minutes.
This resting period is called bench rest. It allows the gluten to relax, making the final shaping easier.
Step 5: Shape the Baguettes
Shaping is one of the most important parts of the recipe.
Take one piece of dough and gently flatten it into a rough rectangle. Fold the top portion toward the center and press lightly to seal. Fold the dough again and seal.
Continue rolling and tightening the dough until you have a long, narrow cylinder.
Use gentle pressure. Avoid aggressively squeezing the dough because excessive handling can remove the gas you worked so hard to develop.
Gradually stretch the baguette until it is approximately 30 to 40 centimeters long, depending on the size of your baking tray and oven.
Repeat with the remaining pieces.
Place the shaped baguettes seam-side down on parchment paper or a lightly floured kitchen towel. Leave space between them.
Cover them and allow them to proof for approximately 30 to 60 minutes.
Step 6: Preheat the Oven Properly
A very hot oven is essential for good baguettes.
Place a baking tray, baking stone, or baking steel in the oven and preheat it to approximately 240–250°C (465–480°F).
Allow the oven to heat thoroughly for at least 30 minutes. If you have a baking stone or steel, giving it additional preheating time helps it become properly saturated with heat.
At the same time, place an empty metal pan on a lower oven rack. This will be used to create steam during baking.
Do not use a glass dish for this purpose because pouring water into a very hot glass container can cause thermal shock.
Step 7: Score the Baguettes
Just before baking, carefully transfer the baguettes to parchment paper or your preheated baking surface.
Using a bread lame or very sharp knife, make several diagonal cuts along the top of each baguette.
The cuts should overlap slightly and be made at a shallow angle rather than straight down.
Scoring gives the expanding bread a controlled place to open during oven spring. Without scoring, the baguette may burst unpredictably along the side.
Try to make confident, quick cuts rather than slowly dragging the blade through the dough.
Step 8: Add Steam
Steam is extremely important during the first part of baking.
Place the baguettes in the hot oven and immediately pour a small amount of hot water into the preheated metal pan on the lower rack. Close the oven door quickly.
Be careful when adding water because the resulting steam can cause burns.
Steam keeps the surface of the dough flexible during the early stages of baking. This allows the baguettes to expand before the crust becomes firm.
If your oven has a steam function, you can use it according to the manufacturer’s instructions.
Step 9: Bake Until Golden Brown
Bake the baguettes with steam for approximately 10 to 15 minutes.
Then carefully remove the steam pan if possible and continue baking for another 10 to 15 minutes, or until the baguettes are deeply golden brown.
The exact baking time will depend on the size of your baguettes and the behavior of your oven.
Do not remove them when they are merely pale golden. A darker golden-brown crust usually means more developed flavor and a better crisp texture.
For an especially crisp crust, you can turn the oven off near the end of baking and leave the baguettes inside with the door slightly open for several minutes. This helps excess moisture escape.
Step 10: Cool Before Slicing
Transfer the finished baguettes to a wire rack as soon as they come out of the oven.
Let them cool for at least 20 to 30 minutes before slicing.
It can be tempting to cut into a freshly baked baguette immediately, but the interior continues to set as it cools. Cutting too early can make the crumb seem gummy or compressed.
Once cooled slightly, listen for the characteristic crackling sound of the crust. That is a great sign that you have achieved a crisp exterior.
Slice with a serrated bread knife and enjoy.
Tips for a Crispy Crust
Getting a crisp baguette crust depends on several factors.
Use enough heat. A properly preheated oven provides the intense heat needed for strong oven spring.
Use steam early. Steam delays crust formation and allows the loaf to expand.
Do not overproof the dough. An overproofed baguette may have poor oven spring and a flatter shape.
Bake until deeply golden. Underbaked bread tends to have a softer crust and less-developed flavor.
Let the bread cool on a rack. Cooling on a solid surface can trap steam underneath and soften the crust.
Tips for a Soft, Airy Interior
The airy interior begins with fermentation.
Avoid adding excessive flour during mixing or shaping. A stiff dough generally produces a denser crumb.
Handle the dough gently after fermentation. The bubbles created by yeast contribute to the open texture.
Give the dough enough time to ferment. If you rush the process, the baguettes may taste bland and have a tighter crumb.
At the same time, avoid excessive proofing. The dough should look puffy and alive, but it should still have enough strength to expand dramatically in the oven.
Common Problems and How to Fix Them
My dough is too sticky
A wet baguette dough is naturally sticky. Instead of immediately adding more flour, try wetting your hands or using a dough scraper.
If the dough is extremely loose and impossible to handle, your flour may have lower absorption. Next time, reserve some of the water and add it gradually.
My baguette is dense
Dense bread is often caused by insufficient fermentation, excessive handling, or too much flour.
Make sure the dough becomes noticeably puffy during the first rise. Also, avoid pressing all the air out while shaping.
My baguette did not rise in the oven
Poor oven spring can result from underdeveloped gluten, overproofing, insufficient oven heat, or weak shaping.
Make sure the oven is fully preheated before the baguettes go inside.
My crust is soft
Insufficient baking, inadequate steam management, or cooling the bread improperly can result in a soft crust.
Bake the baguettes until deeply golden and allow them to cool completely on a wire rack.
My baguette split on the side
This usually means the bread needed a better expansion point.
Make sure your scoring cuts are deep and angled correctly. Also check that you are not skipping the final proof.
How to Store Homemade Baguettes
Baguettes are best on the day they are baked.
If you need to keep one for the next day, wrap it loosely in a clean cloth or paper rather than sealing it tightly in plastic, which can soften the crust.
For longer storage, slice the baguette and freeze it in an airtight freezer bag. When you are ready to eat it, reheat the slices or the whole loaf in a hot oven.
A short reheating period can restore much of the crust’s crispness.
Easy Ways to Serve Your Baguette
Fresh baguette is incredibly versatile. Serve slices with butter, cheese, soup, or your favorite spread.
You can also use it for:
- Garlic bread
- Bruschetta
- Crostini
- French toast
- Sandwiches
- Bread pudding
- Croutons
- Soup and stew accompaniment
- Breakfast toast with eggs
- Simple butter and jam
For an especially simple snack, slice a warm baguette and serve it with butter and a pinch of flaky salt.
Final Thoughts
Making a homemade French baguette is less about having perfect equipment and more about understanding the dough. Use good flour, keep the dough relatively hydrated, develop gluten through gentle folding, give fermentation enough time, and handle the dough carefully.
Most importantly, pay attention to the oven. A very hot oven combined with steam during the early stage of baking is what helps create the classic contrast between a thin, crisp, golden crust and a soft, airy, chewy interior.
Your first baguette may not look exactly like one from a French bakery, and that is perfectly fine. With each batch, you will become better at recognizing when the dough is properly fermented, how much pressure to use during shaping, and how your oven affects the final crust.
Once you master the basic method, you can experiment with longer fermentation, different flours, larger or smaller baguettes, and more advanced shaping techniques. The simple combination of flour, water, yeast, and salt can produce remarkably delicious bread when given enough time and careful handling.
If you’d like, I can also turn this into a SEO-optimized food-blog version with a recipe card, prep/cook times, nutrition section, FAQs, and Pinterest-friendly headings.

