Ingredients
- 2 cups whole wheat flour
- 1½ cups all-purpose flour
- 2¼ teaspoons active dry yeast
- 1½ cups warm water
- 2 tablespoons honey or sugar
- 2 tablespoons vegetable oil or melted butter
- 1 teaspoon salt
- 2 tablespoons milk powder, optional
- 1 tablespoon sesame or sunflower seeds, optional
- Extra flour, as needed for kneading
Instructions
1. Activate the Yeast
Start by preparing the yeast. Pour the warm water into a large mixing bowl. The water should be comfortably warm, not hot. Add the honey or sugar and active dry yeast.
Stir gently and leave the mixture for about 5–10 minutes. If the yeast is active, you should see a light layer of foam or bubbles forming on the surface.
This step is important because it confirms that your yeast is working properly. If there is no activity after about 10 minutes, the yeast may be old or the water may have been too hot or too cold.
2. Combine the Flours
In a separate bowl, combine the whole wheat flour, all-purpose flour, salt, and milk powder if you are using it.
Whole wheat flour gives the bread its characteristic brown color, hearty flavor, and slightly nutty taste. The all-purpose flour helps make the loaf softer and lighter.
Gradually add the dry ingredients to the yeast mixture while stirring with a wooden spoon or spatula.
3. Add the Oil
Add the vegetable oil or melted butter to the dough. Continue mixing until a rough dough begins to form.
The dough may initially look sticky. Avoid adding too much flour at this stage. Whole wheat flour absorbs water gradually, so the dough often becomes easier to handle after a few minutes of kneading.
4. Knead the Dough
Transfer the dough to a lightly floured work surface. Knead it for approximately 8–10 minutes.
Push the dough forward with the heel of your hand, fold it back, rotate it slightly, and repeat. Continue until the dough becomes smoother and more elastic.
You can also knead the dough in a stand mixer using a dough hook.
The finished dough should be soft and slightly tacky but should not stick excessively to your hands. If it is extremely sticky, add flour one tablespoon at a time.
Avoid adding too much flour because a very dry dough can produce a dense loaf.
5. First Rise
Place the kneaded dough into a lightly greased bowl. Turn the dough once so that its surface is lightly coated with oil.
Cover the bowl with plastic wrap, a clean kitchen towel, or a lid. Place it somewhere warm and allow the dough to rise for approximately 1–1½ hours.
The dough should become noticeably larger and ideally double in size.
The exact rising time depends on the temperature of your kitchen. In a warm environment, the dough may rise quickly, while a cooler kitchen can require additional time.
6. Shape the Loaf
Once the dough has doubled, gently press it down to release excess air.
Transfer it to your work surface and shape it into a loaf. Flatten the dough into a rectangle, then roll it tightly from one end to the other. Pinch the seam closed.
Place the shaped dough into a greased standard loaf pan with the seam facing down.
If you want a rustic homemade appearance, you can also shape the dough into a round loaf and bake it on a lined baking tray.
7. Second Rise
Cover the shaped dough and let it rise again for approximately 30–45 minutes.
It should become puffy and rise above the edges of the loaf pan.
Do not allow the dough to overproof. If it rises too much, it may collapse during baking.
While the dough is completing its second rise, preheat your oven to 375°F (190°C).
8. Add Toppings
For an attractive finish, lightly brush the top of the dough with milk or water.
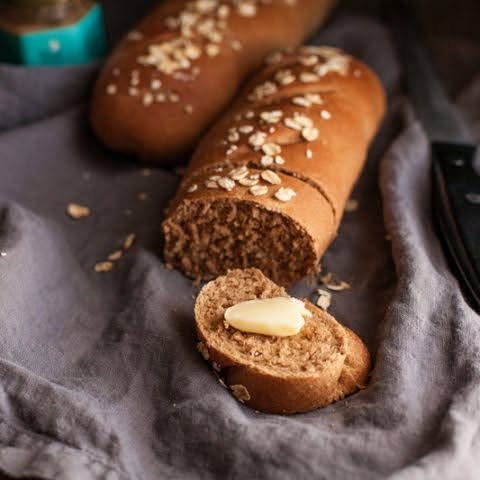
Sprinkle sesame seeds, sunflower seeds, oats, or a mixture of seeds over the surface if desired.
You can also make one or two shallow cuts across the top of the loaf using a sharp knife. This gives the bread a traditional bakery-style appearance and allows steam to escape during baking.
9. Bake the Bread
Place the loaf in the preheated oven and bake for approximately 30–35 minutes, or until the top becomes golden brown.
The bread should sound hollow when gently tapped on the bottom.
If the top begins to brown too quickly, loosely cover it with aluminum foil during the final part of baking.
Avoid opening the oven repeatedly because changes in temperature can affect the rise and texture of the bread.
10. Cool Completely
Remove the bread from the oven and allow it to cool in the pan for about 10 minutes.
Then carefully remove it from the pan and place it on a wire rack.
Allow the loaf to cool completely before slicing. Although warm homemade bread smells irresistible, cutting it too soon can make the inside appear gummy or compressed.
Once cool, use a sharp serrated bread knife to cut even slices.
Tips for Perfect Brown Bread
Use fresh yeast: Old yeast may prevent your bread from rising properly.
Do not use very hot water: Extremely hot water can kill yeast. The water should feel warm and comfortable to the touch.
Do not add excessive flour: A slightly soft dough usually produces softer bread.
Give the dough enough time to rise: Rising time depends on room temperature, so use the size of the dough rather than the clock as your main guide.
Knead properly: Good kneading develops gluten and helps create a soft, elastic loaf.
Let the bread cool: Cooling allows the crumb to finish setting and makes slicing easier.
Variations
You can easily customize this homemade brown bread according to your taste.
For multigrain brown bread, replace some of the flour with oats, millet flour, flaxseed meal, or other whole grains.
For honey brown bread, use honey instead of sugar for a naturally sweet flavor.
For seeded brown bread, add sunflower seeds, pumpkin seeds, flaxseeds, or sesame seeds to the dough.
For a rich and soft loaf, replace some of the water with warm milk and use melted butter instead of vegetable oil.
You can also add a tablespoon or two of wheat germ for an extra wholesome flavor.
How to Store Brown Bread
Once completely cool, store the bread in an airtight bread bag or container at room temperature. It is best enjoyed within 2–3 days for maximum freshness.
For longer storage, slice the loaf and place the slices in a freezer-safe bag. Freeze for up to 2–3 months. Individual slices can be removed whenever needed and toasted directly from frozen.
Avoid storing homemade bread in the refrigerator unless necessary, as refrigeration can make bread become stale and firm more quickly.
How to Serve Brown Bread
Homemade brown bread is incredibly versatile. Serve it warm with butter, jam, honey, or peanut butter for breakfast.
It also makes excellent sandwiches. Use it with eggs, cheese, grilled chicken, vegetables, or tuna. Toasted brown bread pairs wonderfully with soups and salads as well.
For a quick snack, toast a slice and top it with mashed avocado, cream cheese, or your favorite spread.
You can also use slightly stale slices to make French toast, bread pudding, croutons, or breadcrumbs.
Frequently Asked Questions
Can I make this bread with only whole wheat flour?
Yes, but the texture will be denser and heartier. If you prefer a softer loaf, keeping some all-purpose flour in the recipe gives better results.
Why is my brown bread dense?
Dense bread can result from too much flour, insufficient kneading, inactive yeast, or inadequate rising time. Make sure your yeast is active and allow the dough to rise until it has visibly doubled.
Can I make this recipe without sugar?
Yes. You can reduce the sugar or honey. The small amount in this recipe primarily adds flavor and helps support yeast activity.
Can I make brown bread without an oven?
A covered heavy pot or suitable stovetop bread method can be used, although the crust and texture may differ from oven-baked bread.
Conclusion
Making homemade Brown Bread is easier than it may seem. With whole wheat flour, a few simple ingredients, active yeast, and a little patience, you can create a soft and flavorful loaf in your own kitchen.
The combination of whole wheat and all-purpose flour gives this bread a pleasant balance between wholesome flavor and soft texture. Once you master the basic recipe, you can experiment with seeds, oats, honey, milk, and different whole grains to create your own favorite version.
Freshly baked brown bread is perfect for breakfast, sandwiches, toast, and snacks. The wonderful aroma that fills the kitchen while it bakes is an added bonus. With this simple recipe, you can enjoy delicious homemade bread without relying on store-bought loaves.

