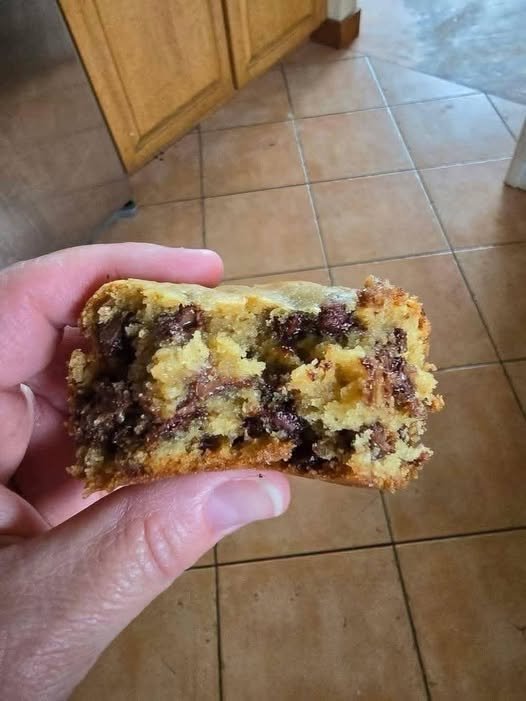
If you love classic chocolate chip cookies but don’t love spending time scooping and baking dozens of individual cookies, these Chewy Chocolate Chip Cookie Bars are the perfect solution. They have everything you want in a great chocolate chip cookie—crispy, golden edges, a soft and chewy center, plenty of buttery flavor, and generous pockets of melted chocolate—but they are baked all at once in a single pan.
These cookie bars are incredibly easy to make and are perfect for family desserts, bake sales, parties, lunchboxes, holidays, or simply satisfying a chocolate craving. The recipe uses basic pantry ingredients, requires no mixer, and can be prepared in just a few simple steps.
Why You’ll Love These Cookie Bars
The best part of these bars is their texture. They aren’t cake y or dry. Instead, they have a wonderfully chewy center with slightly crisp edges. Brown sugar provides moisture and a deep caramel-like flavor, while melted butter gives the bars their rich, buttery taste.
Another advantage is that you don’t have to chill individual cookie dough balls or bake multiple trays. Simply mix the dough, spread it into a pan, and bake.
You can also customize the recipe easily. Use dark chocolate chips for a richer flavor, milk chocolate chips for extra sweetness, or a combination of chocolates for a more sophisticated dessert.
Ingredients
- 1 cup (226 g) unsalted butter, melted and slightly cooled
- 1 cup (200 g) packed light brown sugar
- ½ cup (100 g) granulated sugar
- 2 large eggs
- 2 teaspoons vanilla extract
- 2¼ cups (280 g) all-purpose flour
- 1 teaspoon baking soda
- ½ teaspoon salt
- 1½ cups (255 g) semisweet chocolate chips
- ½ cup (85 g) milk chocolate chips, optional
- Flaky sea salt, optional, for topping
Ingredient Notes
Butter: Melted butter gives these bars a rich flavor and wonderfully chewy texture. Let the butter cool slightly before adding the eggs so the eggs don’t become partially cooked.
Brown sugar: Brown sugar is one of the secrets to soft, chewy cookie bars. Its moisture helps prevent the finished bars from becoming dry.
Granulated sugar: Regular sugar contributes sweetness and helps create lightly crisp edges.
Eggs: Eggs bind the ingredients together and provide structure. Use room-temperature eggs if possible.
Vanilla: Vanilla enhances the buttery and chocolate flavors.
Flour: Measure flour carefully. Too much flour can make the bars dense and dry. If using measuring cups, spoon the flour into the cup and level it rather than packing it down.
Chocolate chips: Semisweet chocolate chips create a classic flavor, but you can use your favorite variety.
Preparing the Pan
Preheat your oven to 350°F (175°C).
Line a 9×13-inch baking pan with parchment paper. Leave some parchment extending over two sides of the pan. This creates convenient handles that make it easy to remove the baked cookie slab later.
Lightly grease the parchment if desired.
Using parchment is particularly helpful because these bars are soft when they first come out of the oven. It prevents them from sticking and makes slicing much easier.
Making the Cookie Dough
Place the melted butter in a large mixing bowl. Add the brown sugar and granulated sugar.
Whisk until the mixture is smooth and glossy. You don’t need an electric mixer for this recipe. A sturdy whisk or wooden spoon works perfectly.
Add the eggs one at a time, whisking well after each addition. Stir in the vanilla extract.
The mixture should become smooth and slightly thick.
In a separate bowl, combine the flour, baking soda, and salt. Whisk the dry ingredients together to distribute the baking soda and salt evenly throughout the flour.
Gradually add the dry ingredients to the wet mixture.
Use a spatula or wooden spoon to stir until just combined. Don’t over-mix the dough. Stop as soon as you no longer see large streaks of dry flour.
Over-mixing can develop too much gluten, which may result in tougher cookie bars rather than the soft, chewy texture you’re looking for.
Adding the Chocolate
Fold the semisweet chocolate chips into the dough.
If you’re using milk chocolate chips as well, add them at the same time. Save a small handful of chocolate chips for the top.
For an even more chocolate-filled dessert, you can replace some of the chips with chopped chocolate. Chopped chocolate melts into larger pools throughout the bars, while chocolate chips retain their recognizable shape.
Baking the Bars
Transfer the dough to the prepared pan.
The dough will be thick, so use a spatula to spread it evenly from corner to corner. Try to create an even layer so the bars bake uniformly.
Sprinkle the reserved chocolate chips over the surface.
Place the pan in the preheated oven and bake for approximately 22–27 minutes.
The exact baking time will depend on your oven and the thickness of the dough. Look for golden-brown edges and a center that appears set but still slightly soft.
Don’t wait for the center to become completely firm and dark. Over baking is one of the easiest ways to lose the chewy texture.
The bars will continue to cook from the residual heat of the pan after you remove them from the oven.
The Importance of Cooling
Allow the cookie bars to cool in the pan for at least 30 minutes.
They will be very soft when hot, so cutting them immediately can result in messy pieces. As they cool, the butter and chocolate firm up and the bars develop their final chewy texture.
For especially clean slices, allow the bars to cool completely.
Once cool, use the parchment-paper handles to lift the entire slab out of the pan. Place it on a cutting board and use a sharp knife to cut it into squares or rectangles.
For an attractive finish, sprinkle a little flaky sea salt over the top before serving. The salt provides a pleasant contrast to the sweet chocolate.
How to Make Them Extra Chewy
There are several simple tricks that can help you achieve the best possible texture.
First, don’t over bake the bars. The center should remain slightly soft when the pan comes out of the oven.
Second, use brown sugar as directed. It provides moisture that contributes significantly to the chewy texture.
Third, don’t add excessive flour. Accurate measuring is important.
Finally, allow the bars to cool before cutting. This gives the structure time to set while keeping the inside soft.
Delicious Variations
These cookie bars are easy to customize.
For double chocolate cookie bars, replace ¼ cup of the flour with unsweetened cocoa powder.
For peanut butter chocolate chip bars, swirl a few spoonfuls of creamy peanut butter over the dough before baking.
For salted caramel bars, add small pieces of soft caramel to the dough and finish with flaky sea salt.
For nutty chocolate chip bars, fold in ½ cup of chopped walnuts or pecans.
For a festive version, mix in colorful candy-coated chocolate pieces along with the chocolate chips.
You can also use white chocolate, dark chocolate, butterscotch chips, or a combination of different chocolates.
Serving Suggestions
These cookie bars are delicious at room temperature, but they’re especially irresistible when slightly warm.
Serve a warm bar with a scoop of vanilla ice cream for an easy dessert. You can also drizzle the top with melted chocolate or caramel sauce.
For parties, cut the slab into smaller squares. This makes the recipe go further and creates bite-sized treats that are easy to serve.
They also make excellent additions to lunchboxes and dessert trays.
Storage
Once completely cooled, place the cookie bars in an airtight container.
They can be stored at room temperature for approximately 3–4 days. Place parchment paper between layers if you are stacking them.
For longer storage, wrap individual bars tightly in plastic wrap or place them in a freezer-safe container. Freeze for up to 2–3 months.
To serve frozen bars, let them thaw at room temperature. You can also microwave an individual bar briefly to recreate that warm, freshly baked texture.
Final Thoughts
These Chewy Chocolate Chip Cookie Bars are an easy, dependable dessert that combines the best qualities of homemade chocolate chip cookies with the convenience of a one-pan recipe. You get buttery, chewy centers, golden edges, and plenty of gooey chocolate in every bite without having to bake multiple batches.
The key to success is simple: measure the flour carefully, avoid over-mixing, and most importantly, don’t over bake. When the center still looks slightly soft, take the pan out of the oven and let the residual heat finish the job.
Once you’ve mastered the basic recipe, experiment with different chocolates, nuts, caramel, peanut butter, or other favorite cookie additions. Whether served warm with ice cream or enjoyed straight from the container, these cookie bars are sure to become a favorite homemade treat.

