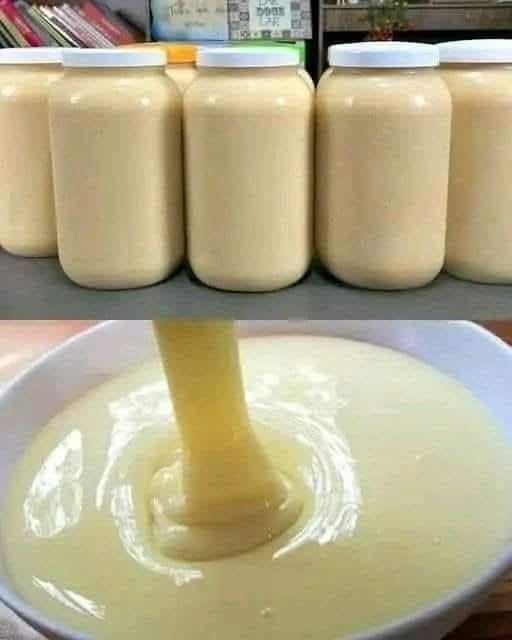
Sweetened condensed milk is a wonderfully versatile ingredient for desserts, drinks, baking, ice cream, fudge, and many traditional sweets. Making it at home in a Thermomix is surprisingly simple. With just a few basic ingredients, you can prepare a smooth, creamy condensed milk with a rich milky flavour and the characteristic sweetness you expect from store-bought versions.
This homemade version is particularly useful when you need condensed milk for a recipe but do not have a can available. It also gives you control over the sweetness and allows you to make a fresh batch whenever you need it.
Ingredients
For approximately 1½–2 cups of homemade condensed milk, you will need:
- 500 g full-fat milk
- 200–250 g white granulated sugar
- 50 g unsalted butter
- 1 teaspoon vanilla extract or vanilla essence
- A small pinch of salt
Full-fat milk is strongly recommended because it produces a richer and creamier result. You can adjust the sugar slightly according to your taste, although reducing it too much may affect the texture and keeping quality of the finished condensed milk.
Method
1. Prepare the Thermomix
Make sure the Thermomix bowl is completely clean and dry before beginning. Any leftover food residue, particularly from strongly flavoured dishes, can affect the taste of your condensed milk.
Add the milk, sugar, butter, and pinch of salt to the Thermomix bowl.
Set the Thermomix to:
20 minutes / 90°C / Speed 2
Leave the measuring cup off the lid if your model and recipe setup allow safe evaporation, and place the simmering basket on top of the lid to reduce splashing. The purpose of this stage is to heat the mixture while beginning to concentrate the milk.
2. Reduce and thicken the milk
Once the mixture has heated, continue cooking so that some of the water evaporates and the milk becomes more concentrated.
Set:
25–35 minutes / Varoma temperature / Speed 2
Keep the measuring cup removed if appropriate for your Thermomix model, with the simmering basket positioned securely on top of the lid.
The exact cooking time can vary depending on your Thermomix model, the starting temperature of the ingredients, the type of milk used, and how thick you want the condensed milk to be.
During cooking, the mixture should gradually become thicker and creamier. Remember that it will continue to thicken considerably as it cools, so do not wait for it to become extremely thick while it is still hot.
3. Add the vanilla
At the end of cooking, add the vanilla extract or vanilla essence.
Mix for:
10 seconds / Speed 3
Taste carefully once the mixture has cooled slightly. If necessary, you can add a little more vanilla, but avoid adding too much because the flavour can become overpowering.
4. Check the consistency
The finished condensed milk should be smooth, glossy, creamy, and noticeably thicker than ordinary milk. When warm, it may still look relatively fluid. This is normal.
Transfer a small spoonful to a cool plate and allow it to sit for a minute or two. If it becomes thick and creamy as it cools, your condensed milk is ready.
If it still appears very thin after cooling, return it to the Thermomix and cook for another 5–10 minutes at Varoma / Speed 2, checking the consistency again afterward.
Be careful not to overcook it. Excessive cooking can cause the milk sugars to caramelise, producing a darker colour and a flavour that is more similar to caramel than traditional condensed milk.
Cooling the Condensed Milk
Pour the hot condensed milk into a clean, heatproof glass jar or container. Allow it to cool at room temperature for a short time before sealing.
As it cools, the mixture will become thicker. Once completely cool, close the container and refrigerate it.
Homemade condensed milk is generally best used within several days when stored properly in the refrigerator. Because homemade versions do not contain the same commercial stabilisers and processing as canned products, they should be treated as a fresh dairy preparation.
Always use a clean spoon when taking condensed milk from the container.
How to Use Thermomix Condensed Milk
There are countless ways to use homemade condensed milk. It is particularly useful in recipes where you want sweetness and creaminess without adding large amounts of liquid.
You can use it for:
- Homemade ice cream
- Fudge
- Cheesecake
- Caramel desserts
- No-bake slices
- Lemon desserts
- Chocolate truffles
- Milkshakes
- Coffee and tea
- Indian and South Asian sweets
- Coconut desserts
- Cakes and cupcakes
- Biscuits and cookies
- Banoffee-style desserts
- Homemade kulfi
- Fruit desserts
One of the easiest uses is to combine condensed milk with whipped cream and flavourings to make a simple no-churn ice cream. You can also mix it with cocoa powder and melted chocolate to create a rich chocolate dessert mixture.
Tips for the Best Results
Use full-fat milk.
Low-fat or skim milk contains less fat and can produce a thinner and less creamy result. Full-fat milk gives the finished condensed milk a much more luxurious consistency.
Do not rush the reduction.
The most important part of the process is allowing enough water to evaporate. Cooking at an appropriate temperature and speed helps concentrate the milk without aggressively boiling it.
Watch the mixture near the end.
Once the milk begins to thicken, it can change consistency relatively quickly. Check it regularly during the final cooking stage.
Remember that it thickens when cold.
This is one of the most common mistakes when making homemade condensed milk. A hot mixture will naturally look thinner than the final refrigerated product.
Use good-quality butter.
Butter contributes richness and helps create a smooth mouthfeel. Unsalted butter is preferable because you can control the amount of salt yourself.
Vanilla is optional.
Traditional sweetened condensed milk does not necessarily require vanilla. If you intend to use the condensed milk in a strongly flavoured dessert, you can leave it out.
Can You Make It Without Butter?
Yes. Butter is not essential, but it contributes to the richness and creamy texture of this Thermomix version.
If you prefer a simpler preparation, you can make condensed milk using only milk and sugar. However, the result may be slightly less rich and may require careful cooking to achieve the desired consistency.
A simple ratio to remember is approximately 2 parts milk to 1 part sugar by weight, although the precise ratio can be adjusted depending on the desired sweetness and concentration.
Can You Use Evaporated Milk?
Yes. Evaporated milk can be used as an alternative starting ingredient and can produce a particularly rich condensed milk. Because evaporated milk has already had some of its water removed, the total cooking time may be shorter.
If you use evaporated milk, watch the mixture carefully during the reduction stage and stop cooking once it reaches the desired consistency.
Troubleshooting
My condensed milk is too thin.
Return it to the Thermomix and cook for another few minutes at Varoma temperature, Speed 2. Allow it to cool before deciding whether it needs additional cooking.
My condensed milk is too thick.
Whisk in a small amount of warm milk until you reach the desired consistency. Add the milk gradually because a little can make a significant difference.
The mixture has become brown.
It has probably been cooked for too long or at too high a temperature. Milk sugars can caramelise during prolonged heating. A slightly golden colour is not necessarily a problem, but dark brown condensed milk will have a caramelised flavour.
The condensed milk tastes grainy.
This can happen if sugar crystallises or the mixture is cooked too aggressively. Make sure the sugar dissolves completely during the initial heating stage and avoid unnecessarily high temperatures for extended periods.
It is sticking to the bowl.
Thick milk mixtures can cling to the bottom of the bowl as they concentrate. Proper stirring helps, and cleaning the bowl promptly after transferring the condensed milk makes the job considerably easier.
Storage
Store the finished condensed milk in a clean, airtight container in the refrigerator.
Because this is a homemade dairy product, do not leave it at room temperature for extended periods. Refrigerate it promptly after cooling and discard it if it develops an unusual smell, appearance, or flavour.
For convenience, you can make a batch and divide it into smaller containers. This is particularly useful if you regularly make desserts that require only a few tablespoons at a time.
Recipe Summary
Preparation: 5 minutes
Cooking: approximately 45–60 minutes
Yield: approximately 1½–2 cups, depending on reduction
Thermomix: suitable for TM5, TM6, and similar models, with temperature/safety settings adjusted according to your model’s instructions
Ingredients:
- 500 g full-fat milk
- 200–250 g sugar
- 50 g unsalted butter
- 1 teaspoon vanilla
- Pinch of salt
Method:
- Add milk, sugar, butter, and salt to the Thermomix bowl.
- Heat for 20 minutes / 90°C / Speed 2.
- Continue cooking for approximately 25–35 minutes / Varoma / Speed 2, allowing steam to escape safely according to your Thermomix model.
- Add vanilla.
- Mix for 10 seconds / Speed 3.
- Transfer to a clean container.
- Cool completely—the condensed milk will thicken as it cools.
- Refrigerate and use in your favourite desserts.
The key to excellent Thermomix condensed milk is patience during the reduction stage. The goal is not simply to boil the milk and sugar, but to gradually remove enough water to create the thick, creamy consistency associated with sweetened condensed milk. Once you understand that the mixture thickens further during cooling, it becomes much easier to get consistent results.
This homemade Thermomix condensed milk is an excellent staple to keep in the refrigerator whenever you want to make quick desserts. It is creamy, sweet, versatile, and can be incorporated into everything from ice cream and fudge to cakes, puddings, and traditional milk-based sweets.

