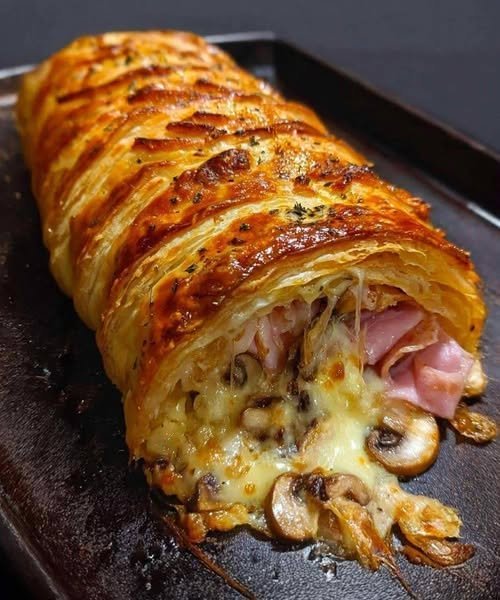
Ingredients
For the pastry:
- 1 package frozen puff pastry sheets, approximately 17 ounces
- 1 egg
- 1 tablespoon water or milk
- 1 tablespoon sesame seeds, optional
- 1 tablespoon poppy seeds, optional
- A small amount of flour for rolling
For a savory filling:
- 2 cups cooked shredded chicken, ground beef, or cooked vegetables
- 1 cup shredded cheese
- 1/2 cup finely chopped onion
- 1/2 cup chopped bell pepper
- 2 cloves garlic, minced
- 1 teaspoon paprika
- 1/2 teaspoon black pepper
- 1/2 teaspoon salt, or to taste
- 1/2 teaspoon dried oregano
- 1 tablespoon olive oil
The filling can be adjusted according to your preferences. The most important thing is that the filling should be cooked and cooled before being placed inside the puff pastry.
Step 1: Thaw the Puff Pastry
If using frozen puff pastry, remove the sheets from the freezer and allow them to thaw according to the package directions.
The pastry should become flexible enough to unfold without cracking, but it should still feel cool. Avoid leaving it at room temperature for too long. Warm puff pastry becomes soft and sticky, making it difficult to handle and reducing its ability to puff properly in the oven.
If the pastry becomes too soft while you’re working, place it in the refrigerator for 10–15 minutes before continuing.
Step 2: Prepare the Filling
Prepare your chosen filling before assembling the pastry.
For a savory filling, heat olive oil in a skillet over medium heat. Add the chopped onion and bell pepper and cook for approximately 3–5 minutes, until softened. Add the garlic and cook for another 30 seconds.
Add the cooked chicken, beef, or vegetables and season with paprika, black pepper, salt, and oregano. Stir well and cook for several minutes until everything is hot and well combined.
Remove the filling from the heat and allow it to cool completely.
This step is extremely important. Hot filling can soften the butter layers in the puff pastry before baking, resulting in a pastry that doesn’t rise properly.
Once cooled, stir in the shredded cheese if desired.
Step 3: Prepare the Work Surface
Lightly flour your work surface and gently unfold the puff pastry.
If necessary, roll the pastry lightly with a rolling pin to smooth out creases. Avoid rolling it too thin because puff pastry needs sufficient layers to rise and become flaky.
If you are making individual pastries, cut the sheet into equal-sized rectangles or squares. For one large stuffed pastry, keep the sheet whole.
Step 4: Add the Filling
Place the cooled filling in the center of the pastry.
Do not overfill. Although it can be tempting to add a generous amount of filling, excessive filling can prevent the pastry from sealing properly and may cause it to burst during baking.
Leave approximately 1 inch of pastry around the edges.
If you’re using cheese, distribute it evenly over the filling rather than creating one very thick layer.
Step 5: Seal the Pastry
Fold the puff pastry over the filling to create your desired shape.
For individual pastries, you can fold each piece into a rectangle or triangle. For a larger pastry, fold one side over the filling and bring the other side over it.
Press the edges together firmly with your fingertips.
For an extra-secure seal, use the tines of a fork to crimp around the edges. This creates an attractive decorative border while helping prevent the filling from escaping during baking.
If the edges feel dry, lightly moisten them with a little water before pressing them together.
Step 6: Chill Before Baking
Transfer the assembled pastry to a parchment-lined baking sheet.
Place the baking sheet in the refrigerator for approximately 15–20 minutes.
This short chilling period helps firm the butter layers in the pastry. Cold puff pastry generally produces better lift and more distinct flaky layers when it enters the hot oven.
While the pastry chills, preheat the oven to 400°F (200°C).
Make sure the oven is fully preheated before baking.
Step 7: Apply the Egg Wash
In a small bowl, whisk together one egg with one tablespoon of water or milk.
Remove the chilled pastry from the refrigerator and brush the top lightly with the egg wash.
Try to keep the egg wash on the surface rather than allowing it to run down the sides. Excess egg wash on the edges can sometimes interfere with the pastry’s ability to rise.
For additional decoration, sprinkle sesame seeds, poppy seeds, dried herbs, or grated cheese over the top.
Step 8: Cut Steam Vents
Using a sharp knife, make two or three small slits in the top of a large stuffed pastry. If you’re making individual pastries, one small slit may be sufficient.
These openings allow steam to escape while the pastry bakes.
You can also use the knife to create simple decorative patterns, but avoid cutting too deeply into the pastry or exposing the filling.
Step 9: Bake the Puff Pastry
Place the baking sheet in the center of the preheated oven.
Bake for approximately 20–30 minutes, depending on the size of the pastry. Individual turnovers may take closer to 18–25 minutes, while a larger stuffed pastry may need 25–35 minutes.
Avoid opening the oven repeatedly during the first 15 minutes. Puff pastry relies on strong heat to create steam, which pushes the layers upward and gives the pastry its characteristic flaky texture.
The pastry is ready when it is dramatically puffed and deeply golden brown.
If the top becomes brown before the pastry is fully baked, loosely cover it with aluminum foil and continue baking.
Step 10: Rest Before Serving
Once the pastry is finished, carefully remove it from the oven.
Allow it to rest on the baking sheet for approximately 5–10 minutes.
This gives the filling time to settle and makes slicing easier. Cutting immediately can release hot steam and juices, potentially making the pastry soggy.
Transfer the pastry to a serving platter or cooling rack if desired.
Troubleshooting Tips
If your puff pastry does not rise properly, the pastry may have become too warm before baking. Always keep it chilled and place it into a fully preheated oven.
If the bottom is soggy, the filling may have contained too much moisture. Drain cooked vegetables and meat thoroughly, and allow the filling to cool before assembling.
If the filling leaks, the pastry may have been overfilled or the edges may not have been sealed securely. Leave enough room around the edges and crimp them firmly.
If the pastry burns on top, reduce the oven temperature slightly or cover the pastry loosely with foil during the final stage of baking.
Serving Suggestions
Serve stuffed puff pastry warm with a fresh green salad, roasted vegetables, soup, or a creamy dipping sauce.
For a savory version, garlic sauce, yogurt sauce, tomato chutney, or a simple herb dip can complement the filling beautifully.
For a special occasion, slice a large stuffed pastry into neat portions and garnish with fresh parsley, cilantro, or chives.
Storage and Reheating
Leftover stuffed puff pastry can be refrigerated in an airtight container for up to 3 days.
For the best texture, reheat it in an oven or air fryer rather than a microwave. Heat at approximately 350°F (175°C) until warmed through and crisp.
You can also freeze unbaked assembled pastries. Place them on a baking sheet until firm, then transfer them to a freezer-safe container. Bake directly from frozen, adding several extra minutes to the baking time.
Final Thoughts
Finishing and baking stuffed puff pastry is all about temperature, timing, and careful handling. Keep the pastry cold, use a cooled filling, seal the edges well, brush the surface with egg wash, and bake in a properly preheated oven.
The result should be beautifully puffed pastry with crisp, golden layers surrounding a warm and flavorful filling. Once you master these simple techniques, you can create countless variations for breakfast, lunch, dinner, parties, holidays, or special occasions.

